Category: technology

  • Edit old commit message on github

    Edit old commit message on github

    Sometimes we make mistake in git commit message, especially spelling mistake. Even though I think twice before pressing the enter key after I write the commit message, I made spelling mistake twice or thrice. That’s my bad actually and I accept it.

    So let’s start changing old commit message from GitHub. One thing you need to note that this will edit your commit message from the particular branch only.

    Step 1: Open terminal or ( cmd for windows user ) and go to the particular repository.


    Step 2: run command git log


    Step 3: Choose a commit message which you want to change and count on which position that commit message is. Let’s say it is on 6th position.


    Step 4: run git rebase -i HEAD~7

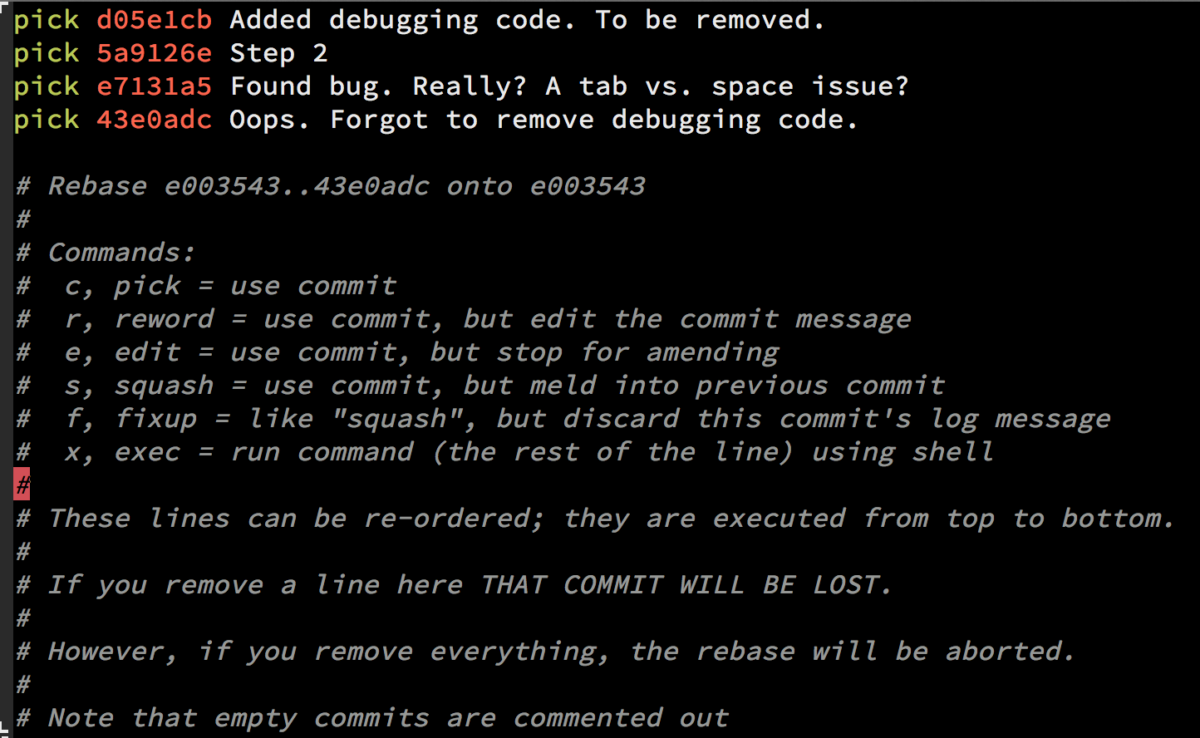
    by running this message you will get output something like this:

    pick 0856faf Message 1
    pick 7ef84df Message 2
    pick 55930c2 Message 3
    pick 9bf24e0 Message 4
    pick 412fc71 Message 5
    pick 483f8b6 Message 6
    pick c101979 Message 7
    
    # Rebase 0c6220f..c101979 onto 0c6220f (7 command(s))
    #
    # Commands:
    # p, pick = use commit
    # r, reword = use commit, but edit the commit message
    # e, edit = use commit, but stop for amending
    # s, squash = use commit, but meld into previous commit
    # f, fixup = like "squash", but discard this commit's log message
    # x, exec = run command (the rest of the line) using shell
    # d, drop = remove commit
    #
    # These lines can be re-ordered; they are executed from top to bottom.
    #
    # If you remove a line here THAT COMMIT WILL BE LOST.
    #
    # However, if you remove everything, the rebase will be aborted.
    #
    # Note that empty commits are commented out
    

    Note: HEAD~7 because we want to edit 6th commit message. For a safe side, we add one more message.


    Step 5: Change command pick to reword , as we only want to change the commit message. Like as shown below and exit ( ctrl+X )

    pick 0856faf Message 1
    reword 7ef84df Message 2
    pick 55930c2 Message 3
    pick 9bf24e0 Message 4
    pick 412fc71 Message 5
    pick 483f8b6 Message 6
    pick c101979 Message 7
    
    ( You can edit multiple messages too. )
    

    Note: There are other options that you can do for commits. Those options you can see right below your commit message list.


    Step 6: After that, you will be asked to change your commit message. So edit it and save it ( ctrl+x ).


    Step 7: Now run git push --force origin

    ( use –force is compulsary. Otherwise there will be double commit message )

    Note: During push it will show some warnings. Ignore it as it is warning 😉 . Sit back and relax.


    Yepieeeeeee. Your message is changed

    If you have any issue then comment it. I will try my best to solve the issue.

  • PHPCode Sniffer + Sublime on windows

    PHPCode Sniffer + Sublime on windows

    Things you need for:

    1. cmder
    2. composer
    3. Sublime Text 2/3

    We are going to install using composer, because it will automatically install related packages. So no need to do too many manual stuffs.

    Step 1: Open “cmder” and run following command

    composer global require "squizlabs/php_codesniffer=*"

    This will install php code sniffer into your system.

    Step 2: Now run following command into “cmder”.

    composer create-project wp-coding-standards/wpcs --no-dev

    This will install and register WordPeress coding standards into code sniffer.


    Now we will integrate the code sniffer into sublime text editor. You will need package installer for that. You can install that from here

    Step 3: Open Sublime Text editor and press ctrl+shft+p. You will get the textbox into editor. Type “install package” into that and press enter and wait for a while, don’t change the window.

    Step 4: After a while you will again get a textbox. Type “phpcs” and you will get the result and click on “phpcs” and wait. This will install code sniffer package for sublime.

    Step 5: Go to “Preferences->Package Settings->PHP Code Sniffer->Settings-Default“.

    Step 6: Add “phpcs_executable_path” as shown below.

    "phpcs_executable_path": "C:\\Users\\YOUR_USERNAME\\wpcs\\vendor\\bin\\phpcs.bat",

    Step 7: Save the file and restart sublime.

    That’s it….!!!!!!! Code sniffer is integrate with sublime.

    To check if it’s working or not, open any PHP file and “right click->PHP Code Sniffer->Switch coding standards” and chose any coding standard which you want.

    After that again “right click->PHP Code Sniffer->Sniff this file“. You will get some error according to your chosed coding standard.

    So that’s all for now. If you have any question, then write down into comments. I will try to answer those questions.

  • Install wp-cli on windows

    Install wp-cli on windows

    WP-CLI is a set of command-line tools for managing WordPress installations. You can update plugins, configure multisite installs and much more, without using a web browser.

    So I am going to tell you short, simple and easy way that how to use wp-cli on windows system.

    Step 1: Create folder named “bin” at location “C:\Users\USERNAME\bin”.

    Step 2: Download wp-cli.phar and put this file into “bin” folder ( created in step 1 ).

    Now let’s go to next step. Yehh!!!!! still some steps are remaining. So now we will create a bat file for wp command.

    Don’t know to create bat file ? Don’t worry it’s ok if you don’t know something… See this for how to create bat file.

    Step 3: After creating that file rename it to “wp.bat” add the following code into that file.

    @ECHO OFF
    SET BIN_TARGET=%~dp0/./wp-cli.phar
    php "%BIN_TARGET%" %*
    

    Step 4: Now go to Control Panel -> System -> Advanced System settings ( left sidebar ) and click on “Environment variables” and then chosse “PATH” from user variables and click edit.

    systemsettings          ->         uservariables                                                                         variables


    Step 5: Now add two paths into Variable values at value. 1st is PHP path ( where your php is installed. ). In my case it’s ;D:\xamp\php and 2nd is your wp-cli path ( we created in step 1 ) which is ;C:\Users\bunty\bin.

    Final value will be like this:

    C:\Users\bunty\AppData\Roaming\npm;C:\Users\bunty\AppData\Roaming\Composer\vendor\bin;D:\xamp\php;C:\Users\bunty\bin


    Now we will check if it works or not. But before this you need to restart your PC and follow next steps.

    Open cmd ( hopping that you all have different method to open it… ) and go to “C:\Users\USERNAME\bin” location by the following command:

    cd C:\Users\USERNAME\bin

    and after that run following command 

    php wp-cli.phar --info

    Hope you will get output something like this:

    cmd

    Awwwww…!!!!!! feels good right….!!!!!!!

    Feeeeewwww…!!!!!!! this is too much right..?!!!! But cooool, you did it. Yes, you have completed the installation now. the only thing is need rightnow is just test it. To check and see whether WP-CLI is set up properly, execute the following line on the command prompt:

    wp --info

    And you will get same result as step 2 like this:

    wp-cli

    Finally it is done. Now you can use wp-cli commands. Now in cmd, just go to root of your WP installation and run following command:

    wp plugin install bbpress --activate

    And tell me what happens…..? I am not gonna tell you..!!!!! You tell me…..!!!!!!!

    That’s it…