For this fix please visit below link.
https://bhargavb.wordpress.com/2020/02/28/fix-404-error-on-nginx/
For this fix please visit below link.
https://bhargavb.wordpress.com/2020/02/28/fix-404-error-on-nginx/
Sometimes you get the below error while importing the database.
ERROR 1031 (HY000) at line 5643 in file: '/Users/username/Downloads/database.sql': Table storage engine for 'table_name' doesn't have this option
Now let’s fix this.
Step – 1
Open your sql file in your favourite editor and go to SQL query of that table.
You will see ROW_FORMAT=FIXED at the last of the query and remove that.
Step – 2
Save your file and try to import the database. This should fix the error.
That’s it

Sometimes you get unexpected 404 error from Nginx server. And I am going to tell you how I fixed the issue.
You can fix that easily by the following steps:
Step 1 (Debugging):
You first need to find out the reason. For that, you can the first login to your server via ssh and check the error log for Nginx server.
Open the following file: /var/log/nginx/error.log and check the latest errors.
In my case I was having the following error:
2020/02/28 08:19:02 [error] 17627#17627: *14299 upstream sent too big header while reading response header from upstream, client: 172.31.4.43, server: yoursite.com, request: "GET /wp-login.php?action=switch_to_user&user_id=2928&nr=1&_wpnonce=9085bda773&redirect_to=https%3A%2F%yoursite.co%2Fmembers%2Fdesigner-buddyboss%2F HTTP/1.1", upstream: "fastcgi://unix:/run/php/php7.1-fpm.sock:", host: "yoursite.co", referrer: "https://yoursite.co/members/designer-buddyboss/"
Step 2 (Solution):
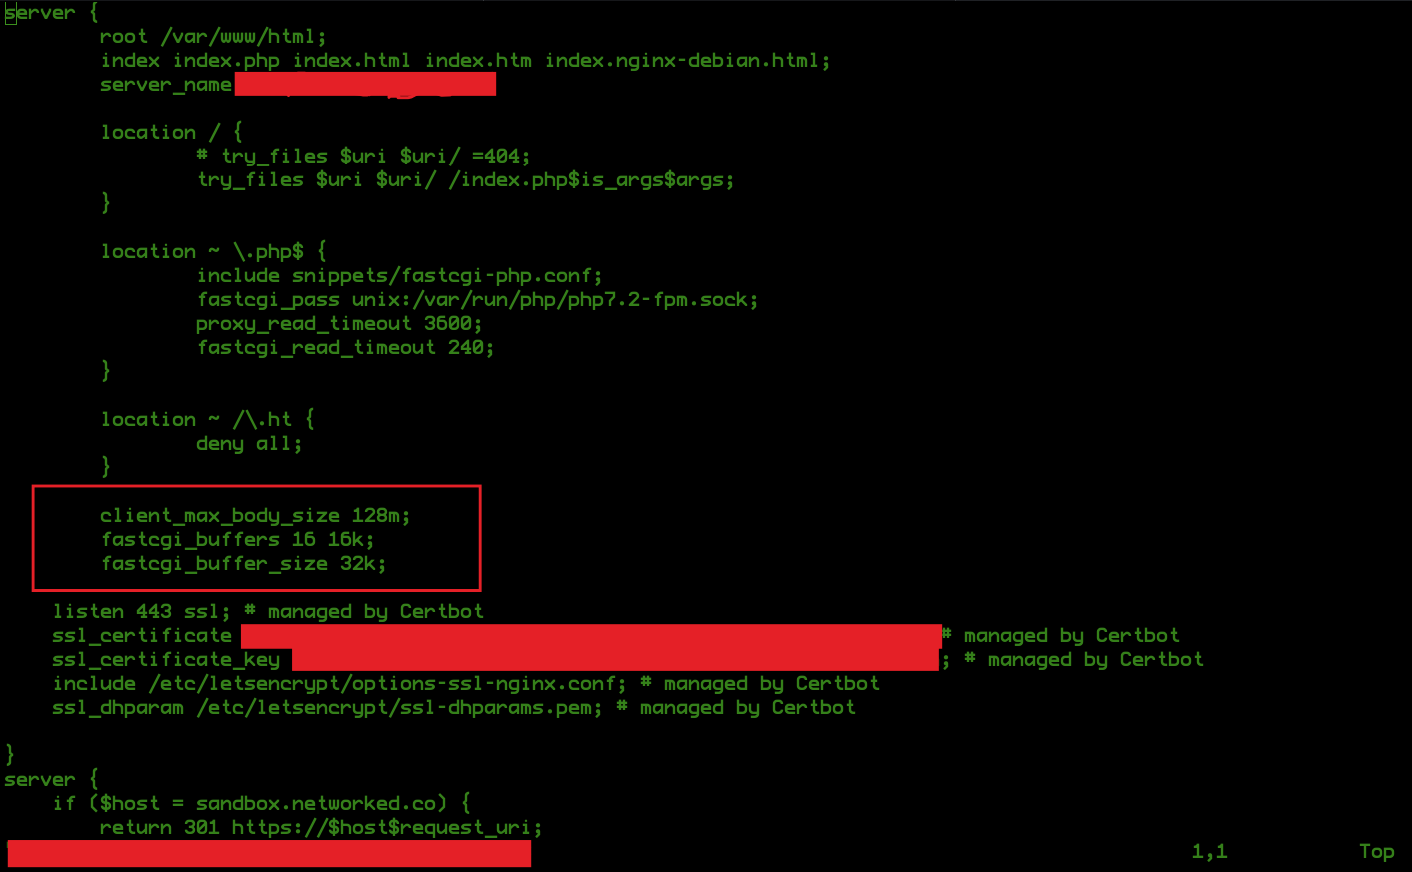
After exploring on google I found this solution which worked for me. We need to add the following lines into the Nginx config file:
client_max_body_size 128m;
fastcgi_buffers 16 16k;
fastcgi_buffer_size 32k;
Now the following file could be responsible for your site:
Check if this file available /etc/nginx/sites-enabled/your_site.conf ( This was the responsible file in my case )
OR
/etc/nginx/sites-available/your_site.conf
OR
/etc/nginx/sites-available/nginx.conf
Open one of the files.
Step 3 (Apply Solution):
Now add those 3 lines into the config file like this
After adding this restart Nginx server by the following command:
sudo service nginx restart
That’s it!!!!
Safe way to do this by creating a new branch with a particular commit hash.
Here is an example:
git checkout -b new_branch 6e559cb( replace with your hash )
That’s it!!!
Apply svn patch
patch -p0 -i path_of_patch_file.patch

Example: patch -p0 -i /Users/blah/Downloads/7526.2.patch
Undo svn patch
svn patch --reverse-diff path_of_patch_file.patch

Example: svn patch --reverse-diff /Users/blah/Downloads/7526.2.patch